Using the Level of Detail node
Use the Level of Detail node when you want to show different appearances of the same node, or different node, based on the viewing distance of the Level of Detail node. Each child of a Level of Detail node sets a single appearance and a constraint when that appearance is selected and shown. The constraint can be either:
- Minimum distance from the Preview Camera node. You set the constraint by setting the value of the Minimum Distance property. Lower values set a child node to be selected when the Preview Camera node is closer to that node. Higher values set a child node to be selected when the Preview Camera node is further away from that node. Kanzi shows the child whose distance value is the next largest compared to the distance between the Level of Detail node and the Preview Camera node.
- Minimum coverage of the screen. You set the constraint by setting the value of the Minimum Area property. The coverage of the screen is measured in range [0...1], where 0 means that the node does not cover the screen at all, and 1 means that the node completely covers the screen. Kanzi shows the child node whose area value is the next largest compared to the Level of Detail node's bounding box projection area to the screen.
Level of Detail nodes affect only rendering, which is why you cannot use them in layouts. The size of a Level of Detail node is the size of its largest child node, even if that child node is not visible.
NOTE
You can use a Level of Detail node only when its Scene node uses a Legacy Render Pass (deprecated) to render the content of that Scene node.
Using a Level of Detail node
To use a Level of Detail node:
- Set a Scene node to render a Level of Detail node:
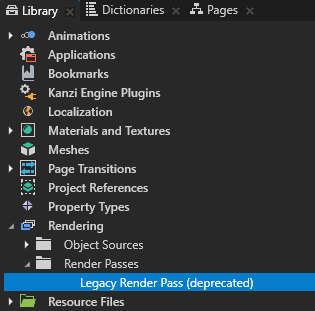
- In the Library press Alt and right-click Rendering, select Legacy Render Pass (deprecated), and in the Properties set its properties so that you get the required rendering result.
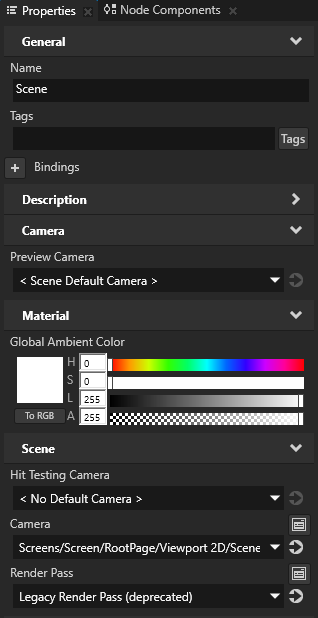
- In the Project select the Scene node where you want to create a Level of Detail node and in the Properties set the Render Pass property to the Legacy Render Pass (deprecated) that you created.
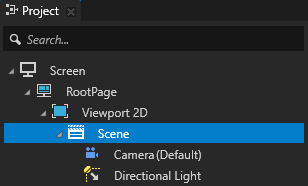
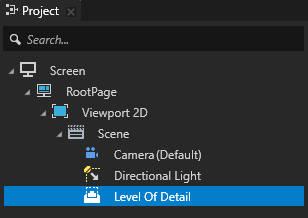
- In the Project press Alt and right-click the Scene node that you set up and select Level of Detail.
Note that you can create a Level of Detail node only inside a 3D node.
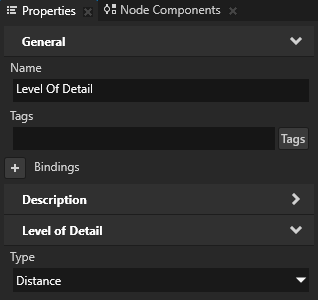
- In the Properties set the Type property to either:
- Distance to create a Level of Detail node that shows its child nodes based on the distance between the Level of Detail node and the preview camera.
- Perspective to create a Level of Detail node that shows its child nodes whose area value is the next largest compared to the bounding box projection area of the Level of Detail node to the screen.
For example, set Type to Distance.
- In the Project add child nodes to the Level of Detail node.
For example, add a Sphere, a Box, and a Plane node.
For each node that you add to the Level of Detail node, based on the type of the Level of Detail node that you selected, Kanzi Studio adds either the Minimum Distance or Minimum Area property.
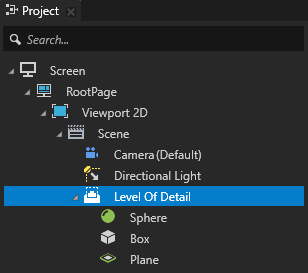
- Select each node that you added to the Level of Detail node and in the Properties, depending on the type of the Level of Detail node, set either the Minimum Distance or Minimum Area property value to define when the Level of Detail node shows each item.
For example, if you set Type to Distance, in the Project select:- Sphere and set its Minimum Distance property to 0.
- Box and set its Minimum Distance property to 10.
- Plane and set its Minimum Distance property 20.
When you move the Level of Detail node or the preview camera along the z axis, Kanzi shows the child node whose distance value is the next largest compared to the distance between the Level of Detail node and the preview camera.
Using the Level of Detail node in the API
To create a distance level of detail selector node with three levels of detail:
// Create a level of detail selector node named LOD selector.
LevelOfDetail3DSharedPtr lodSelector = LevelOfDetail3D::create(domain, "LOD selector");

// Add three levels of detail, one child for each level.
lodSelector->addChild(lodHigh);
lodSelector->addChild(lodMedium);
lodSelector->addChild(lodLow);

// Set the level of detail selector node to show its child objects based on the
// level of detail selector node's distance from the preview camera.
lodSelector->setType(LevelOfDetail3D::LodTypeDistance);
// Use low level of distance child (lodLow) when the preview camera distance is
// at least 10.0f.
LevelOfDetail3D::setMinimumDistance(*lodLow, 10.0f);
// Use medium level of distance child (lodMedium) when the preview camera distance
// is at least 5.0f, but less than 10.0f.
LevelOfDetail3D::setMinimumDistance(*lodMedium, 5.0f);
// Use high level of distance child (lodHigh) when preview camera distance is
// less than 5.0f.
LevelOfDetail3D::setMinimumDistance(*lodHigh, 0.0f);
For details, see the LevelOfDetail3D class in the API reference.
Level of Detail property types and messages
For a list of the available property types and messages for the Level of Detail node, see Level of detail.
See also
Using the Empty Node nodes

Open topic with navigation